Tuesday, February 28, 2017

Kindness Matters Card


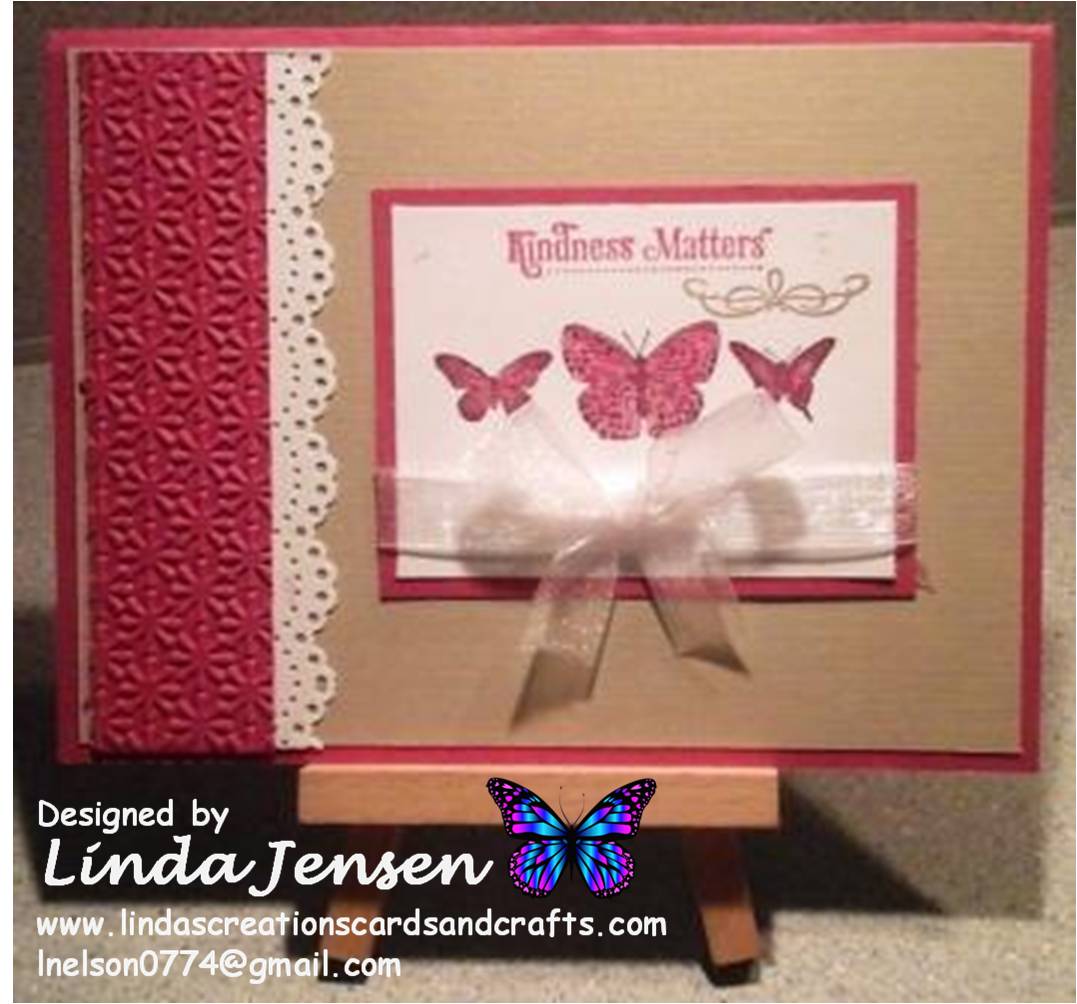
I made this cute card with my Stampin' Up! Kindness Matters stamp set and I love how it turned out. The colors look awesome together and I love the details in the butterflies. Here's how I made it:

First cut a 6" x 9" piece of pink card stock and fold it in half for the base, a 4 1/4" x 5 3/4" piece of Stampin' Up! Crumb Cake for the front layer, a 1 1/2" x 4 1/4" piece of white for the strip's first layer, a 1 1/8" x 4 1/4" piece of pink for the strip, a 2 1/2" x 3 1/4" piece of pink for the image's first layer and a 2 1/4" x 3" piece of white for the image.

Then use a Stamp a ma jig to stamp the butterflies on the 2 1/4" x 3" piece of white card stock in Stampin' Up! Crumb Cake ink. Then color them with Stampin' Up! Rose Red ink and a blender pen making the dots and shaded areas darker. Next stamp the accent in Crumb Cake ink then the sentiment in Rose Red ink. Next attach the butterflies to the 2 1/2" x 3 1/4" piece of pink card stock, add the ribbon and attach it to the front layer. Then emboss a strip of pink card stock with a Stampin' Up! Snowburst embossing folder. Next punch the white strip with a Martha Stewart Doily Lace punch, attach the pink strip to the punched white strip then attach the white strip to the front layer. Next attach the front layer to the base and enjoy!

Please let me know if you have any questions, I'm always happy to help. I always appreciate any comments/suggestions that you'd like to share. Thank you for stopping by, have a great day!

Linda Jensen
www.lindascreationscardsandcrafts.com
360-326-8820
lnelson0774@gmail.com


Flamingo Lingo with Ombre Effect


I made this gorgeous card using my Stampin' Up! Flamingo Lingo and Wetlands stamp sets.It's one of my first attempts at sponging a beach scene and I'm pretty happy with how it turned out. Beginner's luck perhaps? LOL! Here's how to make it:

First cut a 6" x 9 1/2" piece of Stampin' Up! Melon Mambo card stock and fold it in half for the base, a 4 1/2" x 5 3/4" piece of piece of Stampin' Up! Pool Party for the middle layer and a 4 1/4" x 5 1/2" piece of white for the front layer.

Next sponge the front layer with Stampin' Up! So Saffron ink around the area the sun will be, then cut out a circle and attach it with removable adhesive. Next sponge Stampin' Up! Pink Pirouette above the So Saffron, then Stampin' Up! Night of Navy at the top. Next for the ocean sponge Stampin' Up! Pool Party below the So Saffron then Stampin' Up! Crumb Cake at the bottom to create the beach then remove the circle. Next stamp a water texture over the ocean with Stampin' Up! Craft White ink. Then using a stamp positioner stamp the seagulls with the stamp from the Stampin' Up! Wetlands set and the Flamingo's legs with the stamp from Stampin' Up! Flamingo Lingo in Stazon Jet Black ink. Then stamp the flamingo on a piece of scrap paper in Melon Mambo ink, cut it out and attach it above the legs with a mini pop dot. Then finish assembling the card and enjoy!

Please let me know if you have any questions, I'm always happy to help. I always appreciate any comments/suggestions that you'd like to share. Thank you for stopping by, have a great day!

Linda Jensen
www.lindascreationscardsandcrafts.com
360-326-8820
lnelson0774@gmail.com

Easter Egg Nap Card


I made this adorable card with my House-Mouse Easter Egg Nap stamp. I love to collect all House-Mouse stuff 'cause it's so stinkin' adorable. I'm really happy with how this turned out because the colors look great together and I love that background. Here's how to make it:

First cut a 5 1/2" x 11" piece of pink card stock and fold it in half for the base, a 5 3/8" x 5 3/8" piece of light blue for the first layer, a 5 1/4" x 5 1/4" piece of purple for the second layer, a 5 1/8" x 5 1/8" piece of patterned paper for the front layer, a 3 1/8" x 3 1/8" piece of pink for the image first layer, a 3" x 3" piece of light blue for the image second layer, a 2 7/8" x 2 7/8" piece off purple for the image third layer, and a 2 3/4" x 2 3/4" piece of white for the image.

I usually use ink pads and an aqua painter to color my cards but prefer re-inkers for coloring mice because I can add water to lighten the colors. Stamp the image with Stazon Jet Black ink then color the mouse with Stampin' Up! Chocolate Chip and Creamy Caramel re-inkers. Next color the egg and grass with the dark marker in the Stampin' Up! Pink Pirouette Stampin' Blendabilities set, and Soft Sky, Pale Plum and Wild Wasabi ink pads. After image drys assemble the card and enjoy!

Please let me know if you have any questions, I'm always happy to help. I always appreciate any comments/suggestions that you'd like to share. Thank you for stopping by, have a great day!

Linda Jensen
www.lindascreationscardsandcrafts.com
360-326-8820
lnelson0774@gmail.com

Monday, February 27, 2017

Balloon Celebration Birthday Card


I made this card with my Stampin' Up! Celebrate Today and Itty Bitty Banners stamp sets. I like how it turned out. Purple's my favorite color and who doesn't like balloons? LOL! Here's how to make it:

First cut a 6" x 9 1/2" piece of Stampin' Up! Elegant Eggplant card stock and fold it in half for the base, a 4 1/2" x 5 3/4" piece of Stampin' Up! Wisteria Wonder for the middle layer and a 4 1/4" x 5 1/2" piece of white for the front layer

Then watercolor the background by spritzing the white card stock with water and randomly adding Stampin' Up! Elegant Eggplant and Wisteria Wonder inks with an aqua painter and set it aside until dry. Meanwhile cut the balloons out of Elegant Eggplant and Wisteria Wonder card stock with Stampin' Up! Balloons Framelits dies. Then using a Stamp a ma jig stamp the spots and stars on the Wisteria Wonder balloons and leave the Elegant Eggplant one plain. Next attach the balloons to the background with mini pop dots then use a Stamp a ma jig to stamp the balloons' strings in Elegant Eggplant ink then attach the bows with hot glue. Next stamp the sentiment on Wisteria Wonder card stock in Elegant Eggplant ink, cut it out with a Stampin' Up! Bitty Banners Framelits die, attach it to the background with mini pop dots, attach the front to the middle layer then to the base and enjoy!

Please let me know if you have any questions, I'm always happy to help. I always appreciate any comments/suggestions that you're willing to share. Thank you for stopping by, have a great day!

Linda Jensen
www.lindascreationscardsandcrafts.com
360-326-8820
lnelson0774@gmail.com

Cupcake Party Card

.

I made this fun card with my Stampin' Up! Cupcake Party and A Cherry On Top stamp sets. I love them both because they're really versatile and the images are adorable. I love how this turned out. The colors are so bright and cheery and who doesn't love cupcakes? Here's how to make it:

First cut a 6" x 9 1/2" piece of Stampin' Up! Melon Mambo card stock and fold it in half for the base, a 4 1/2" x 5 3/4" piece of Stampin' Up! Pink Pirouette for the middle layer, a 4 1/4" x 5 1/2" piece of patterned paper for the front layer, a 1 1/2" x 5 1/2" piece of pink glitter paper for the strip, a 3 1/8" x 3 3/8" piece of Melon Mambo for the cupcake's background, a 3" x 3 1/4" piece of white for the cupcakes, a 3/4" x 2 1/2" piece of Melon Mambo for the sentiment's background and a 1/2" x 2 1/4" piece of white for the sentiment.

Then adhere the strip of pink glitter paper to the patterned paper, the patterned paper to the middle layer and the middle layer to the base and set aside. Next sponge the white card stock's edges and stamp the platter in Stampin' Up! Melon Mambo ink. Then stamp the cupcakes in Melon Mambo and Pink Pirouette inks and punch them out with a Stampin' Up! Cupcake Builder punch. Then attach the cupcakes to the platter with mini pop dots. Next sponge the edges of the small piece of white card stock with Melon Mambo ink then stamp the sentiment. Then finish assembling the card and enjoy!

Please let me know if you have any questions, I'm always happy to help. I always appreciate any comments/suggestions that you'd like to share. Thank you for stopping by, have a great day!

Linda Jensen
www.lindascreationscardsandcrafts.com
360-326-8820
lnelson0774@gmail.com

Happiness Shared with Elements of Style Background


I made this adorable card using my Stampin' Up! Happiness Shared, Elements of Style, and French Script stamp sets. I love how it turned out. The colors are really pretty together and it's so dainty, perfect for a little girl. Here's how to make it:

First cut a 5 3/4" x 8 1/2" piece of white card stock and fold it in half for the base, a 4" x 5 1/2" piece of pink for the middle layer, a 3 3/4" x 5 1/4" piece of white for the front layer, a 1 3/4" x 4 1/2" piece of pink for the image background and a 1 1/2" x 4 1/4" piece of white for the image.

Next create the background with the French Script background stamp in Stampin' Up! Pink Pirouette ink. Then stamp around the edges over the script background with the Elements of Style stamp in Pink Pirouette and Pear Pizzazz inks. I achieved two colors on one stamp by coloring the stamp with markers or ink pads and a blender pen. Then set the background aside. Next heat emboss the flowers from the Happiness Shared stamp set on vellum with Versamark ink and white embossing powder then punch the bottom with a Martha Stewart Doily Lace edge punch. Next flip over the vellum and color the flowers with Pink Pirouette and Pear Pizzazz inks then attach it to the piece of pink card stock. Next cut the small flap out of pink card stock with a Spellbinders Labels Seventeen die then cut off one of the shorter sides and attach it to the top of the strip with the flowers. Next add the self-adhesive pearls and ribbon. Make the bow with a mini bowdabra and attach a button to the center. Then finish assembling the card and enoy!

Please let me know if you have any questions, I'm always happy to help. I always appreciate any comments/suggestions that you'd like to share. Thank you for stopping by, have a great day!

Linda Jensen
www.lindascreationscardsandcrafts.com
360-326-8820
lnelson0774@gmail.com

Stampin' Up!??????????????????????

Hey everyone! 

I really need to make some extra money to help catch up on bills and my medical expenses so I'm considering joining Stampin' Up! as a demonstrator again. Before I make a decision I need to know if anyone would be interested in attending events like make & takes, classes etc. or hosting workshops???? There's no way that I can afford to keep myself active now so I'll definitely need your support. If it's something that you just might be interested in please email me at lnelson0774@gmail.com or call me at 360-326-8820. Thank you for following my blog, I really appreciate it. Have a great day!

Linda


Sunday, February 26, 2017

Feeling Sentimental Phone Booth Card


Here's another fun card that I made with my Stampin' Up! Feeling Sentimental stamp set. I love how it turned out, the polished stone technique looks great with the metallic silver and dark blue card stocks. Here's how I made it:

First cut a 4 1/4" x 11" piece of dark blue card stock and fold it in half for the base, a 4" x 5 1/4" piece of Stampin' Up! Metallic Silver card stock for the front, a 1 3/4" x 5 1/4" piece of glossy white for the polished stone strip, a 2 1/4" x 3 3/4" piece of dark blue for the image's background and a 2" x 3 1/2" piece of white for the image.

Next create the polished stone strip (click here for an awesome tutorial) with Stampin Up! Night of Navy and Adirondak Silver Mixative re-inkers and attach it to the front layer. Then stamp the phone booth on white card stock in Night of Navy ink, stamp around it with a stamp from a Stampin' Up! Gorgeous Grunge set in Night of Navy using the double stamping technique (ink your stamp and stamp on a piece of scrap paper then on your project without re-inking) and attach it to it's dark blue background then to the front layer. Next cut out two black and one white banner using Stampin' Up! Bitty Banners dies then stamp the sentiment on the white one with Night of Navy ink and a stamp from a Stampin' Up! Itty Bitty Banners set. Next attach the banners to the front layer, add a large black or blue button, attach the front to the base and enjoy!

Please let me know if you have any questions, I'm always happy to help I always appreciate any comments/suggestions that you'd like to share. Thank you for stopping by, have a great day!

Linda Jensen
www.lindascreationscardsandcrafts.com
360-326-8820
lnelson0774@gmail.com

Feeling Sentimental Ferris Wheel Card


Here's another card that I made using my Stampin' Up! Feeling Sentimental stamp set. I'm pretty happy with how it turned out. The tickets, ferris wheel and newsprint background take me back to going to the fair when I was a kid. Here's how to make it:

First cut a 6" x 9 1/2" piece of brown card stock and fold it in half for the base, a 4 1/2" x 5 3/4" piece of black for the middle layer, a 4 1/4" x 5 1/2" piece of newsprint card stock for the front layer and a 5 1/2" punched brown strip.

Then dry emboss the newsprint card stock with a Stampin' Up! Honeycomb embossing folder, sponge the edges with Stazon Jet Black ink then attach it to the middle layer. Next punch the lace strip with a Stampin' Up! Large Border Lace punch, attach it to the front layer, then tie Stampin' Up! Hemp Twine around both layers. Next cut two ticket size pieces of brown card stock, punch the corners with a Stampin' Up! Ticket Corner punch and attach them to the front with mini pop dots. Then cut out the white banner with a Stampin' Up! Bitty Banners Framelits die, sponge the edges and stamp the sentiment in Jet Black ink, then attach it to the front with mini pop dots. Next cut out ovals for the ferris wheel and it's background using Spellbinders Classic Oval dies. Then sponge the white oval's edges and stamp the ferris wheel in Jet Black ink, then attach the white oval to the black one then the black one to the front. Finally add a black button, attach the middle layer to the base and enjoy!

Please let me know if you have any questions, I'm always happy to help. I always appreciate any comments/suggestions that you'd like to share. Thank you for stopping by, have a great day!

Linda Jensen
www.lindascreationscardsandcrafts.com
360-326-8820
lnelson0774@gmail.com


Feeling Sentimental Bike Card


I made this cute card with my Stampin' Up! Feeling Sentimental stamp set. It's perfect for making cute and quick cards because it doesn't require much if any coloring. I really like how this turned out. The soft browns and newsprint give it a soft antique look. Here's how to make it:

First cut a 6" x 9 1/2" piece of Stampin' Up! Crumb Cake card stock and fold it in half for the base, a 4 1/2" x 5 3/4" piece of patterned paper for the middle layer, a 4 1/4" x 5 1/2" piece of Stampin' Up! Very Vanilla for the front layer and a 1/2" x 4 1/4" piece of Crumb Cake for the strip. Then sponge all edges with Stampin' Up! Crumb Cake ink.

Next tear the bottom edge of the Very Vanilla card stock and sponge the the torn edge. Then use a Stamp a ma jig to stamp the bicycle (I love love love my Stamp a ma jig lol!!!). Next stamp the rest of the very vanilla card stock with a stamp from the Stampin' Up! Gorgeous Grunge set with the double stamping technique (ink your stamp then stamp it on a piece of scrap paper then w/out re-inking stamp your project). Then stamp the sentiment and attach the thin strip of Crumb Cake card stock and Stampin' Up! Hemp Twine. Next attach the front to the middle layer then to the base and enjoy!

Please let me know if you have any questions, I'm always happy to help. I always appreciate any comments/suggestions you'd like to share. Thank you for stopping by, have a great day!

Linda Jensen
www.lindascreationscardsandcrafts.com
360-326-8820
lnelson0774@gmail.com

Saturday, February 25, 2017

Best Thoughts Mother's Day Card


Here's another card that I made with my Stampin' Up! Best Thoughts stamp set and I love how it turned out. The colors are really vivid and look great together. Here's how I made it:

First cut a 6" x 9 1/2" piece of Stampin' Up! Blackberry Bliss card stock and fold it in half for the base, a 4 1/2" x 5 3/4" piece of Stampin' Up! Elegant Eggplant for the middle layer and a 4 1/4" x 5 1/2" piece of white for the front layer.

Next create the background by sponging Stampin' Up! Blackberry Bliss ink on the white card stock then flick it with water and let it dry. Next stamp the flowers on white card stock with Stazon Jet Black ink, spritz each one with water and color them with Blackberry Bliss, Elegant Eggplant, and Wild Wasabi inks and an aqua painter. When dry cut them out and attach them to the background with mini pop dots. Then using a Stamp a ma jig, stamp your desired sentiment (the stamp I used is from Inkadinkado) in Elegant Eggplant ink. Finally attach the front to the middle layer then to the base and enjoy!

Please let me know if you have any questions, I'm always happy to help. I always appreciate any comments/suggestions that you'd like to share. Thank you for stopping by, have a great day!

Linda Jensen
www.lindascreationscardsandcrafts.com
360-326-8820
lnelson0774@gmail.com

Best Thoughts You're In My Thoughts Card


I made this card with my Stampin' Up! Best Thoughts stamp set. It's another one of my favorites because the flowers are gorgeous and I adore butterflies. This is the first time I used the tissue paper background and I'm pretty happy with how it turned out. A close friend gave it to me so I have no idea what it's called or who made it. I sure wish I did though because I'd love to pick up some more. Please let me know if you know anything about it. Here's how to make it:

First cut a 6" x 9 1/2" piece of Stampin' Up! Baked Brown Sugar card stock and fold it in half for the base, a 4 1/2" x 5 3/4" piece of Stampin' Up! Rose Red for the middle layer, a 4 1/4" x 5 1/2" piece of tissue paper for the front, and a 1" x 5 3/4" piece of Stampin' Up! Rose Red for the strip. 

Then carefully adhere the tissue paper background to the piece of Stampin' Up! Rose Red card stock. Next dry emboss the strip of Rose Red card stock with a Stampin' Up! Large Polka Dots embossing folder and attach it to the tissue paper background. Then stamp the flower on white card stock with Stazon Jet Black ink, color it with Rose Red and Pear Pizzazz ink pads and an aqua painter, then cut it out and attach it to the background with mini pop dots. Next cut out the sentiment with a Spellbinders Labels Four die and sponge the edges with Rose Red ink. Then stamp the sentiment with Stazon Jet Black ink and attach it to the background with mini pop dots. Next stamp the butterfly with Stazon Jet Black ink and color it with Rose Red and Wisteria Wonder inks then cut it out and attach it to the background with mini pop dots. Finally attach the Rose Red layer to the Crumb Cake base and enjoy!

Please let me know if you have any questions, I'm always happy to help. I always appreciate any comments/suggestions that you'd like to share. Thank you for stopping by, have a great day!

Linda Jensen
www.lindascreationscardsandcrafts.com
360-326-8820
lnelson0774@gmail.com


Beautiful Bunch Thinking of You Card


Here's another card that I made with my Stampin' Up! Beautiful Bunch stamp set. It's really versatile, I love the shading and it's sooooo much fun to color lol! Here's how I made it:

First cut a 6" x  9 1/2" piece of Stampin' Up! Wisteria Wonder card stock and fold it in half for the base, a 4 1/2" x 5 3/4" piece of Elegant Eggplant for the middle layer and a 4 1/4" by 5 1/2" piece of white for the front layer.

Then randomly stamp the dots image from the Stampin' Up! Celebrate Today stamp set in Stampin' Up! Wisteria Wonder ink on the white card stock. Create varying shades by double or triple stamping (ink the stamp then stamp on scrap paper either once or twice before stamping on your project without re-inking.) Next stamp the flower twice on another piece of white card stock in Stazon Jet Black ink. Then color them with Wisteria Wonder Stampin' Blendabilities markers or a Wisteria Wonder ink pad with either an aqua painter or blender pen. Next cut out the flowers with a Stampin' Up! Fun Flower punch, attach them to each other with a mini pop dot then to the front layer with another mini pop dot. Finally stamp the sentiment with a stamp from the Stampin' Up! Sincere Salutations set in Wisteria Wonder ink, attach the front layer to the middle then to the base and enjoy!

Please let me know if you have any questions, I'm always happy to help. I always appreciate any comments/suggestions that you'd like to share. Thank you for stopping by, have a great day!

Linda Jensen
www.lindascreationscardsandcrafts.com
360-326-8820
lnelson0774@gmail.com

Beautiful Bunch You're Amazing Card


I made this cute card with my Stampin' Up! Beautiful Bunch stamp set. It's really versatile, I love the shading and It's sooooo much fun to color lol! I'm pretty happy with how this turned out, Blackberry Bliss is one of my favorite Stampin' Up! colors and it looks awesome with Mossy Meadow. Here's how I made it:

First cut a 6" x 9 1/2" piece of Stampin' Up! Blackberry Bliss card stock and fold it in half for the base, a 4 1/2" x 5 3/4" piece of Stampin' Up! Mossy Meadow for the middle layer and a 4 1/4" x 5 1/2" piece of white for the front layer.

Then create the background, randomly stamp the dots image from the Stampin' Up! Celebrate Today stamp set in Blackberry Bliss ink. Create varying shades by double or triple stamping (apply ink to the stamp, stamp on scrap paper either once or twice before stamping on your project). Next stamp the flower twice on another piece of white card stock in Stazon Jet Black ink. Then color the flowers with Blackberry Bliss and Daffodil Delight ink pads and either a blender pen or aqua painter. Next cut out the flowers with a Stampin' Up! Fun Flower punch, attach them to each other with a mini pop dot then to the background with another mini pop dot. Finally stamp the sentiment with a stamp from the Stampin' Up! Painted Petals stamp set in Mossy Meadow, attach the front to the middle layer then to the base and enjoy!

Please let me know if you have any questions, I'm always happy to help. I always appreciate any comments/suggestions that you'd like to share. Thank you for stopping by, have a great day!

Linda Jensen
www.lindascreationscardsandcrafts.com
360-326-8820
lnelson0774@gmail.com

Pugs & Kisses Card


I made this adorable card using my Stampin' Up! Hot Diggity Dog stamp set. It's one of my favorites because the images are adorable and you can mix and match the heads and bodies so it's really versatile. Here's how to make it:

First cut a 6" x 9" piece of Stampin' Up! Blackberry Bliss card stock and fold it in half for the base, a 4 1/4" x 5 3/4" piece of black for the middle layer and a 4" x 5 1/2" piece of white for the front.

Next ink the raised side of a Darice Paw Prints embossing folder then dry emboss the front layer, attach it to the middle layer and set it aside. Then cut out the hearts with Stampin' Up! Hearts a Flutter Framelits Dies and a small heart punch then attach them to the front with mini pop dots. Next cut out the beaded oval with a Spellbinders Beaded Oval die then the smaller one with a Fiskars scalloped oval punch. Then cut out the white ovals with Spellbinders Classic Ovals dies. Next using a Stamp a ma jig stamp the puppy's body on the larger oval with Stazon Jet back ink. Then stamp his head on another piece of card stock, cut it out, and attach it to the body with a mini pop dot. Then attach the larger oval to the beaded one then to the front layer. Next stamp the sentiment on the smaller oval in Jet Black ink, the bone in Blackberry Bliss, attach it to the scalloped oval then to the front layer. Next attach the the middle layer to the base and enjoy!


Please let me know if you have any questions, I'm always happy to help. I always appreciate any comments/suggestions that you'd like to share. Thank you for stopping by, have a great day!

Linda Jensen
www.lindascreationscardsandcrafts.com
360-326-8820
lnelson0774@gmail.com

Thursday, February 23, 2017

I Like You Card


Here's another card that I made with my Stampin' Up! I Like You stamp set. Blackberry Bliss is one of my favorite Stampin' Up! colors so of course I love how it turned out lol! Here's how to make it:

First cut a 6' x 9" piece of Blackberry Bliss card stock and fold it in half for the base, a 4 1/4" x 5 3/4" piece of white for the front layer and a 2" x 4 1/4" piece of designer paper for the bottom strip. 

Then using a stamp positioner, stamp the flowers in Stazon Jet Black ink. Then color the blooms with an aqua painter and Blackberry Bliss and leaves with Old olive ink pads. Next cut out the butterflies using a Stampin' Up! Beautiful Wings Embosslit and attach them with mini pop dots. Then attach the strip of Stampin' Up! Moonlight Designer Series Paper to the bottom and the ribbon by adhering a piece of ribbon to the back of both sides of the card stock then create the bow using a Mini Bowdabra and add a button to it's center. Finally add the self adhesive rhinestones, attach the front layer to the base and enjoy!


Please let me know if you have any questions, I'm always happy to help. I always appreciate any comments/suggestions that you'd like to share. Thank you for stopping by, have a great day!

Linda Jensen
www.lindascreationscardsandcrafts.com
360-326-8820

lnelson0774@gmail.com

Gorgeous Grunge Happy Birthday Card


I made this pretty card using my Stampin' Up! Gorgeous Grunge stamp set. It's another one of my favorites because it's also very versatile. I love how this turned out. The colors look awesome together and I love butterflies! Here's how to make it:

First cut a 6" x 9 1/2" piece of pink card stock and fold it in half for the base, a 4 1/2" x 5 3/4" piece of gray for the middle layer and a 4 1/4" x 5 1/2" piece of white for the front layer.

Then (using a stamp positioner) stamp the circle drops with Stampin' Up! Pink Pirouette ink then stamp the gray blotches with Stampin' Up! Smoky Slate ink. Next stamp the small dots with Stampin' Up! Basic gray ink, then stamp the sentiment with a stamp form the Stampin' Up! Sincere Salutations set in Basic Gray ink. Then cut out the butterfly using the Stampin' Up! Butterflies Thinlits Dies and the flowers with misc flower punches. Next attach the flowers and butterfly with mini pop dots then add the self adhesive rhinestones and assemble the card. Enjoy!


Please let me know if you have any questions, I'm always happy to help. I always appreciate any comments/suggestions that you'd like to share. Thank you for stopping by, have a great day!

Linda Jensen
www.lindascreationscardsandcrafts.com
360-326-8820
lnelson0774@gmail.com


Painted Petals Birthday Card


Here's another card that I made with my Stampin' Up! Painted Petals stamp set. I love this set because it's really versatile. As you probably know purple's my favorite color so of course I love how this turned out LOL! Here's how to make it:

First cut a 6" x 9" piece of Stampin' Up! Blackberry Bliss card stock and fold it in half for the base, a 4 1/4" x 5 3/4" piece of white for the front layer, a 1 3/4" x 5 3/4" piece of designer paper for the strip, a 3 1/4" x 3 1/4" piece of Blackberry Bliss for the image background and a 3" x 3" piece of white for the image.

Then dry emboss the front layer with a Stampin' Up! Honeycomb embossing folder then attach the strip of Stampin' Up! Painted Blooms Designer Series Paper and set it aside. Then using a stamp positioner, stamp the leaves on the 3" x 3" piece of white card stock with Stampin' Up! Pear Pizzazz ink then the flowers and sentiment (I used a stamp from my Stampin' Up! Bloom with Hope set) with Blackberry Bliss ink. Next stamp the butterfly on a piece of scrap paper with a stamp from the Stampin' Up! Papilion Potpourri set with Blackberry Bliss ink and punch out with a Stampin' Up! Bitty Butterfly punch and attach with a mini pop dot. Finally assemble the card and enjoy!


Please let me know if you have any questions, I'm always happy to help. I always appreciate any comments/suggestions that you'd like to share. Thank you for stopping by, have a great day!

Linda Jensen
www.lindascreationscardsandcrafts.com
360-326-8820
lnelson0774@gmail.com

Pine Trees on a Snowbank Card


Here's another winter pine tree card made with my Stampin' Up! Lovely as a Tree stamp set. It's one of my favorites because it's really versatile. It has a tree that works for every season or reason. I'm really happy with how this turned out. The colors look great together and I love the ombre effect. Here's how I made it:

First cut a 6" x 9" piece of navy blue card stock and fold it in half for the base, a 4 1/4" x 5 3/4" piece of Stampin' Up! Elegant Eggplant for the middle layer and a 4" x 5 1/2" piece of white for the front layer.

Then using a stamp positioner stamp both trees with the Stampin' Up! Lovely as a Tree set in Stazon Jet Black ink. Then sponge the top half of the sky with Stampin' Up! Night of Navy ink from dark to light then the bottom half with Stampin' Up! Elegant Eggplant ink again from dark to light starting at the bottom leaving a small amount of white in the middle. Then create the snow by tearing a thin piece of white card stock and adding Diamond Stickles glitter glue to the edge. Allow to dry completely, attach to base of trees, assemble the card and enjoy!

Please let me know if you have any questions, I'm always happy to help. I always appreciate any comments/suggestions that you'd like to share. Thank you for stopping by, have a great day!

Linda Jensen
www.lindascreationscardsandcrafts.com
360-326-8820
lnelson0774@gmail.com

Pine Trees in Winter Card


I made this pretty card using my Stampin' Up! Lovely as a Tree stamp set. Anyone that knows anything about Stampin' Up! knows how awesome this set is. It has several types of trees for almost any season or occasion. It's definitely one that I can't live without. Now, back to the card . . . I'm pretty happy with how it turned out. The colors are very pretty together and I love the ombre effect. Here's how I made it:

First cut a 6" x 9" piece of navy blue card stock and fold it in half for the base, a 4 1/4" x 5 3/4" piece of Stampin' Up! Rose Red for the middle layer and a 4" x 5 1/2" piece of white for the front layer. 

Then using a Stamp a ma jig, stamp both trees with the Stampin' Up! Lovely as a Tree set in Stazon Jet Black ink. Then sponge the top half of the sky with Stampin' Up! Night of Navy ink from dark to light then the bottom half with Stampin' Up! Melon Mambo ink again from dark to light starting at the bottom leaving a small amount of white in the middle. Then create the snow by tearing a thin piece of white card stock and adding Diamond Stickles glitter glue to the edge. Allow to dry completely, attach to base of trees, assemble the card and enjoy!

Please let me know if you have any questions, I'm always happy to help. I always appreciate any comments/suggestions that you'd like to share. Thank you for stopping by, have a great day!

Linda Jensen
www.lindascreationscardsandcrafts.com
360-326-8820
lnelson0774@gmail.com


Painted Petals Thank You Card


I made this pretty card using my Stampin' Up! Painted Petals stamp set. Surprise! It's another one of my favorite sets because I love the flowers, the sentiments are awesome and it's another very versatile set. I love how this turned out. The colors are really bright and cheery and look awesome together. Here's how I made it:

First cut a 6" x 9" piece of Stampin' Up! Melon Mambo card stock and fold it in half for the base, a 4 1/4" x 5 3/4" piece of Stampin' Up! Pink Pirouette for the middle layer, a 4" x 5 1/2" piece of white for the front layer, a 3 1/2" x 3 1/2" piece of Melon Mambo for the image first layer, a 3 1/4" x 3 1/4" piece of Pink Pirouette for the image middle layer, and a 3" x 3" piece of white for the image. 

Then stamp thank you on the front layer in Stampin' Up! Pear Pizzazz ink and set it aside. Next using a stamp positioner (can't live w/out my Stamp a ma jig lol!), stamp the leaves in Pear Pizzazz ink on the 3" x 3"  piece of white card stock then the flowers in Melon Mambo ink. Next using a stamp positioner, stamp the lines beneath the flowers in Melon Mambo ink then add the pink ribbon, assemble the card an enjoy!

Please let me know if you have any questions, I'm always happy to help. I always appreciate any comments/suggestions that you'd like to share. Thank you for stopping by, have a great day!

Linda Jensen
www.lindascreationscardsandcrafts.com
360-326-8820
lnelson0774@gmail.com

Life Without Dogs Card


I made this cute card with my Stampin' Up! Hot Diggity Dog stamp set. It's another one of my favorites because the images are adorable, the sayings are humorous and it's really versatile. It was also really easy to make too. Here's how to do it:

First cut a 6" x 9" piece of pink card stock and fold it in half for the base, a 4 1/4" x 5 3/4" piece of turquoise for the middle layer, a 4" x 5 1/2" piece of white for the front layer, a 2" x 5 1/4" piece of pink for the strip background, a 1 3/4" x 5" piece of patterned paper for the strip, a 2 1/4" x 3" piece of pink for the image background, a 2" x 2 3/4" piece of white for the image, a 1" x 2" piece of pink for the sentiment background and a 3/4" x 1 3/4" piece of white for the sentiment.

Then create the background by inking the raised side of a Darice Paw Print embossing folder with a brayer and Stampin' Up! Melon Mambo ink. Then dry emboss the front layer. Next stamp the dog's head on scrap paper with Melon Mambo ink and cut it out then stamp the body on the 2" x 2 3/4" piece of white card stock. Next attach the head to the body with a mini pop dot then stamp the sentiment. Then create the strip using desired patterned paper (I'm not sure who made mine as I've had it forever and no longer have the package) and attach the ribbon. Next assemble the card, add any desired additional stickers or bling and enjoy!

Please let me know if you have any questions, I'm always happy to help. I always appreciate any comments/suggestions that you'd like to share. Thank you for stopping by, have a great day!

Linda Jensen
www.lindascreationscardsandcrafts.com
360-326-8820
lnelson0774@gmail.com

Wednesday, February 22, 2017

Blackberry Bliss Butterfly Basics Birthday Card


I made this gorgeous card with my Stampin' Up! Butterfly Basics stamp set for my best friend Rebecca's birthday last year. I absolutely love how it turned out and so did she. The colors are gorgeous together and I adore the butterfly die cuts. It was really super easy to make too! Here's how to do it:

First cut a 6" x 9 1/2" piece of black card stock and fold it in half for the base, a 4 1/2" x 5 3/4" piece of Stampin' Up! Blackberry Bliss for the middle layer, a 4 1/4" x 5 1/2" piece of designer paper for the front, a 1 1/8" x 3" piece of black for the sentiment background and a 1" x 2 7/8" piece of white for the sentiment.

Then stamp the sentiment and sponge the edges with Stampin' Up! Blackberry Bliss ink. Then cut out both butterflies with the Stampin' Up! Bold Butterfly Framelits dies and attach them to each other with a mini pop dot. Next add the self adhesive pearls to the butterfly's center and attach the butterflies and sentiment to the piece of Stampin' Up! Painted Blooms Designer Series Paper then finish assembling the card and enjoy!

Please let me know if you have any questions, I'm always happy to help. I always appreciate any comments/suggestions you'd like to share. Thank you for stopping by, have a great day!

Linda Jensen
www.lindascreationscardsandcrafts.com
360-326-8820
lnelson0774@gmail.com

Corner Garden You're In My Thoughts Card


Here's another pretty card that I made with my Stampin' Up! Corner Garden and Best Thoughts stamp sets. I also used my Stampin' Up! Beautiful Wings Embosslit to create the butterflies. I love how this turned out. The colors are so vivid and look awesome together. Here's how I made it:

First cut a 5 3/4" piece of purple card stock and fold it in half for the base and a 4 1/2" x 5 1/2" piece of white for the front layer. 

Then heat emboss the Corner Garden image on white card stock with Versamark ink and black embossing powder then color the flowers with an aqua painter and Stampin' Up! Elegant Eggplant, Tempting Turquoise and Garden Green ink pads. Allow to dry completely. Meanwhile create the butterflies with the Beautiful Wings Embosslit then using a stamp positioner, stamp the sentiment with a stamp from the Best Thoughts stamp set in Elegant Eggplant ink. Finally attach the butterflies with mini pop dots, finish assembling the card and enjoy!

Please let me know if you have  any questions, I'm always happy to help. I always appreciate any comment/suggestions that you'd like to share. Thank you for stopping by, have a great day!

Linda Jensen
www.lindascreationscardsandcrafts.com
360-326-8820
lnelson0774@gmail.com

Blackberry Bliss Corner Garden Card


I made this beautiful card using my Stampin' Up! Corner Garden, Painted Petals, and Hardwood stamp sets. I love these sets because they're very versatile and a whole lot of fun to use. Here's how I made it:

First cut a 5 3/4" x 9 1/2" piece of Stampin' Up! Blackberry Bliss card stock and fold it in half for the base, a 4 1/2" x 5 1/2" piece of Stampin' Up! Very Vanilla for the middle layer, and a 4 1/2" x 5 1/2" piece of vellum for the front.

Then stamp the background using the Stampin' Up! Hardwood stamp in Blackberry Bliss ink and set aside. Then heat emboss the Corner Garden stamp on vellum with Versamark ink and white embossing powder and allow to cool. Next flip the vellum over and color each flower from the back using either an aqua painter or blender pen and Stampin' Up! Wisteria Wonder, Garden Green, and Blackberry Bliss ink pads. Then using a stamp positioner, stamp the sentiment with a stamp from the Painted Petals set in Blackberry Bliss ink and allow to dry. Next attach the vellum to the background and tie a piece of Blackberry Bliss thick baker's twine around the edge of both layers. Then cut out the butterflies with a Stampin' Up! Beautiful Wings Embosslit, attach them to the vellum with mini pop dots, finish assembling the card and enjoy!

Please let me know if you have any questions, I'm always happy to help. I always appreciate any comments/suggestions that you'd like to share. Thank you for stopping by, have a great day!

Linda Jensen
www.lindascreationscardsandcrafts.com
360-326-8820
lnelson0774@gmail.com